
3 Ways to Tell If Your Windows Are Leaking Money (and Heat)
January 29, 2026
Your windows do more than let in light and give you a view. They’re a critical part of your home’s ability to stay comfortable and energy-efficient. When windows leak air, they leak money straight out of your house.
Drafty windows can increase your heating and cooling costs by 25% or more. They make rooms uncomfortable, create cold spots, and force your furnace or air conditioner to work overtime.
The good news is that you can test your windows yourself using simple methods that cost nothing. Let’s look at three easy ways to find out if your windows are wasting your money.
Why Window Air Leaks Matter
Before we get to the tests, it helps to understand why drafty windows are such a problem.
Energy Waste
When cold air leaks in during winter or hot air seeps in during summer, your HVAC system has to compensate. It runs longer and works harder to maintain the temperature you want.
This constant battle against infiltrating air can account for 25-30% of your heating and cooling energy use. For the average home, that’s hundreds of dollars per year literally blowing away.
Comfort Issues
Drafty windows create cold spots near the window and along exterior walls. You might be comfortable sitting in the middle of the room but freezing near the windows.
This leads to thermostat wars. You turn up the heat to warm the cold spots, which makes other areas too hot. Or you live with the discomfort and never quite feel warm.
Moisture Problems
Air leaks don’t just carry temperature. They carry moisture. In winter, warm indoor air leaking out can condense inside your walls, leading to mold and rot.
Cold air leaking in can cause condensation on window glass and frames. Over time, this moisture damages window sills and walls.
Noise Pollution
Windows that leak air also leak sound. You’ll hear more traffic noise, neighbor sounds, and outdoor activity than you would with properly sealed windows.
Test 1: The Visual Inspection
The simplest test requires just your eyes and maybe a flashlight. Do this inspection during daylight hours.
What to Look For
Walk around to each window in your home. Look carefully at:
- The caulk around the exterior window frame
- The weatherstripping along the sash (the moving part of the window)
- The area where the window frame meets the wall
- The glass itself for cracks
- The condition of the glazing (the seal between glass and frame)
Signs of Problems
You’re looking for visible gaps, cracks, or deterioration:
- Cracked or missing caulk
- Weatherstripping that’s compressed, torn, or has pulled away
- Gaps you can see between the window and the frame
- Daylight coming through where it shouldn’t
- Peeling paint or water stains around the window
- Condensation or frost between double-pane glass (indicates seal failure)
The Daylight Test
On a sunny day, close the window and look at the edges where the sash meets the frame. Can you see daylight through any gaps? If light can get through, air definitely can.
Do this from both inside and outside if possible. Sometimes gaps are more visible from one side than the other.
Check the Frame Too
Don’t just look at the window itself. Check where the window frame connects to your house. The gap between the frame and the wall should be filled with insulation and sealed with caulk.
Look for cracks in the caulk. Check if there’s any separation. These perimeter seals are just as important as the window itself.
Test 2: The Candle or Incense Test
This classic test uses smoke to reveal air movement you can’t see or feel. It’s best done on a cold, windy day when the difference between indoor and outdoor temperature is at least 20 degrees.
What You Need:
- A candle, incense stick, or smoke pen (available at hardware stores)
- A windy day
- Time to test each window
How to Do It
Close all your windows and doors. Turn off exhaust fans and your HVAC system. You want to minimize other air movements in your house.
Light your candle or incense stick. Hold it about an inch away from the window frame, moving slowly around the entire perimeter. Also test along the bottom of the window sash and where the two sashes meet on double-hung windows.
What to Watch For
Watch the smoke carefully. If the smoke:
- Blows sideways or away from the window, air is leaking out
- Gets sucked toward the window, air is leaking in
- Wavers or dances around, there’s air movement
Even a slight disturbance in the smoke indicates an air leak. On a calm day, you might not detect small leaks, which is why a windy day works better.
Test Systematically
Start at one corner and work your way around the entire window. Don’t rush. Move the smoke source slowly and watch carefully. Test:
- All four corners
- The entire top and bottom of the frame
- Both sides
- Where window sashes meet
- Around any locks or hardware
- Where the frame meets the wall
Make notes or take photos of problem areas so you remember where leaks are.
Test 3: The Dollar Bill Test
This simple test checks the seal quality on operable windows (windows that open and close). It works great on double-hung, casement, and sliding windows.
How It Works
Open your window. Place a dollar bill (or any piece of paper) so it hangs over the edge of the window sill or frame. Close the window on the dollar bill, trapping it. Now try to pull the dollar bill out.
What the Results Mean
- If the dollar bill pulls out easily with little resistance, the seal is weak. Air can leak through.
- If you have to tug hard to remove the dollar bill, the seal is tight. This window is probably not leaking much air.
- If the dollar bill tears when you pull it, congratulations. That’s an excellent seal.
Test Multiple Spots
Don’t just test one location. Try this test at several points along the window:
- Top center
- Bottom center
- Both sides
- Near the corners
Windows can seal well in some spots and poorly in others. Weatherstripping wears unevenly, especially in areas that get the most use.
Test All Your Windows
Some windows will pass this test while others fail. Older windows or those that get opened frequently are more likely to have worn weatherstripping.
Windows that are rarely opened might seal well, but check the frame-to-wall connection with other tests since they still may leak there.
What to Do When You Find Leaks
Once you’ve identified problem windows, you have several options depending on the severity of the leaks and your budget.
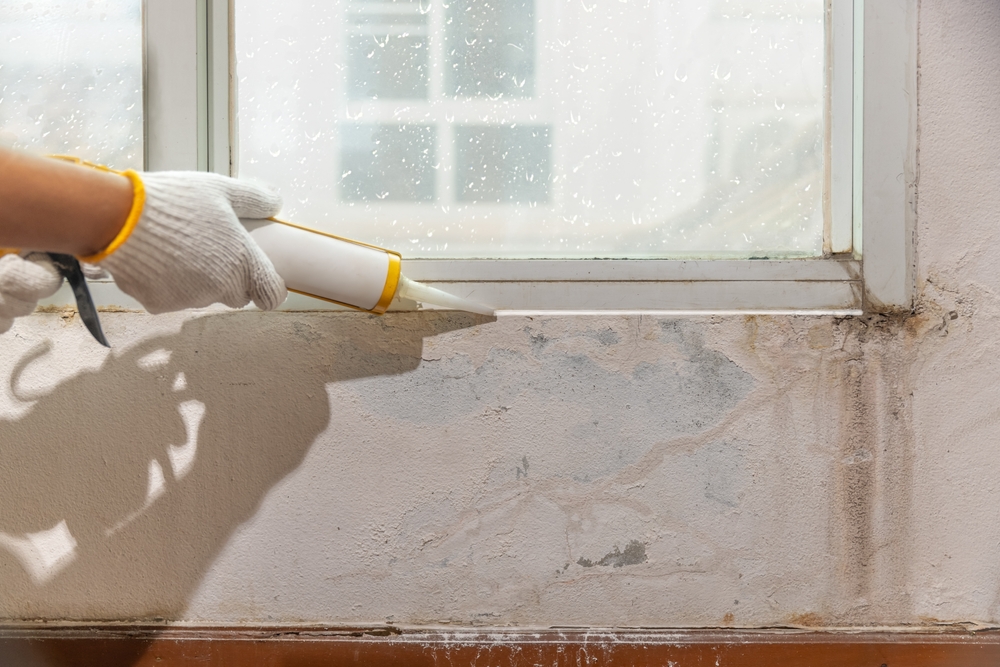
Re-caulk the Exterior
Remove old, cracked caulk with a putty knife or caulk removal tool. Clean the surface thoroughly. Apply new exterior-grade caulk around the window frame where it meets the siding. Use clear or color-matched caulk for a clean appearance. Smooth it with a wet finger or caulk tool.
Replace Weatherstripping
Most windows use either compression weatherstripping (foam or rubber that compresses when the window closes) or V-strip weatherstripping (a folded piece that creates a seal). Both types are available at hardware stores and are easy to install. Measure carefully and buy the right type and size for your windows.
Apply Plastic Film
Window insulation kits with shrink-wrap plastic film create an air barrier over the entire window. They’re temporary (you remove them each spring) but effective at stopping drafts. The film goes on with double-sided tape, and you shrink it tight with a hair dryer. While not the prettiest solution, it works surprisingly well and costs just a few dollars per window.
Use Rope Caulk
For temporary sealing or renters who can’t make permanent changes, rope caulk is a removable putty that fills gaps. Press it into place in the fall and pull it out in the spring.
Medium-Level Fixes
If simple fixes aren’t enough, consider these options:
Install or Replace Window Inserts
Interior storm windows or insulating window inserts fit inside your existing window frame. They create an air gap that provides additional insulation and blocks drafts. These work well for old windows that you want to keep for historic or aesthetic reasons.
Adjust or Repair the Window
Sometimes windows leak because they’re out of alignment or the hardware isn’t working properly. A stuck lock, misaligned sash, or bent track can prevent proper sealing. These repairs often just take adjustment or replacement of small parts.
Major Solutions
For windows that can’t be adequately sealed or are very old and inefficient:
Full Window Replacement
Modern double or triple-pane windows with Low-E coatings are far more energy-efficient than old single-pane windows. They seal better and insulate better. Replacement is expensive but can pay for itself in energy savings over time, especially if you’re replacing very old or damaged windows. Look for windows with good U-factors (lower is better) and ENERGY STAR certification for your climate zone.
How Much Money Are You Really Losing?
The actual cost of drafty windows depends on several factors:
- Your local climate
- How much you heat or cool your home
- Energy costs in your area
- How drafty your windows are
- The size and number of windows
As a rough estimate, if drafty windows are responsible for 25% of your heating and cooling costs, and you spend $2,000 per year on energy, that’s $500 per year going out the windows.
Sealing those leaks might cost $50 to $200 in materials for DIY fixes. The payback period is quick, often less than a year.
Even expensive solutions like window replacement can pencil out. If new windows save you $500 per year and cost $10,000, they pay for themselves in 20 years. Since windows last 20-30 years or more, you come out ahead in the long run.
Beyond Energy Savings
While saving money is a great reason to fix drafty windows, consider the other benefits:
Better Comfort: Your home will feel more comfortable year-round. No more cold spots by the windows. More even temperatures throughout each room.
Improved Air Quality: Reducing uncontrolled air infiltration means less dust, pollen, and outdoor pollutants entering your home. You have better control over your indoor air quality.
Less Noise: Sealed windows block more sound. Your home will be quieter and more peaceful.
Increased Home Value: Energy-efficient windows are a selling point. They’re an upgrade that buyers notice and value.
Environmental Impact: Using less energy means a smaller carbon footprint. You’re reducing demand on power plants and contributing to environmental protection.
When to Test Your Windows
The best time to do these tests is during the heating season (late fall through early spring) or cooling season (summer). Temperature differences between inside and outside make air leaks more obvious.
Test on a windy day if possible, as wind increases the pressure difference and makes leaks easier to detect. Plan to test at least once a year, as your windows’ age and weatherstripping wears out. What seals well this year might leak next year.
Stop Energy Loss at the Source: Find and Fix Drafty Windows
Drafty windows waste energy, cost money, and reduce comfort. The three tests described here—visual inspection, the smoke test, and the dollar bill test—help you identify exactly which windows are leaking and where.
Armed with this information, you can prioritize repairs. Maybe one window is terrible and needs immediate attention, while others just need fresh caulk.
Many fixes are simple and inexpensive. A few hours and a modest budget can dramatically improve your home’s energy efficiency and comfort.
Don’t let your hard-earned money blow out the window. Test your windows, find the leaks, and seal them up. Your wallet, your comfort, and the environment will all benefit. Contact Kontz Construction today to identify and seal drafty windows, improving comfort while cutting energy costs.